
In many programs we may wish to display graphics.
A typical notebook or monitor has a graphical display with a resolution of 1920 x 1080 pixels. Typically each pixel's color is a combination of red, green, and blue components, each of which is an unsigned 8-bit value ranging from 0 to 255. For example, this blueish color has components red = 98, green = 160, blue = 234:
Sometimes we will represent a color using a string such as "#62a0ea", in which the red, green, and blue components are represented as 2-digit hex numbers. For example, 6216 = 9810, a016 = 16010 and ea16 = 23410, so this hex string represents the same blueish color we see above.
Generally we will use a graphics library (also called a toolkit) to perform graphical output. Such libraries will allow us to draw low-level shapes such as lines, rectangles, and circles, and may also provide higher-level widgets such as menus, buttons, and toolbars that we can use to build more complex graphical interfaces. The term GUI (= graphical user interface) generally refers to a user interface of this sort.
Some popular cross-platform graphics toolkits include GTK and Qt. These are large and complex, and are accessible from many languages including Python. Most desktop applications that come with Ubuntu and other Linux distributions use either GTK or Qt.
Additionally, there exist various Python-specific libraries including Tkinter and Pygame. Tkinter is part of the standard library in every Python installation, and includes many widgets such as menus and buttons. Pygame is a popular cross-platform library for creating real-time games in Python. Pygame doesn't come with Python, but you can easily install it using pip.
If you're writing a desktop application such as a text editor or calendar program, Tkinter is probably a good choice because its widgets will be helpful for building your program's interface. On the other hand, if you want smooth real-time graphics, it will probably be easier to write your program in Pygame. If you're implementing a turn-based board game and don't need widgets, either library could be OK.
In this class we won't have time to explore Tkinter in much depth, but at least we'll at least learn how to draw shapes on a canvas and handle events. This will enough to implement simple games such as Tic-Tac-Toe.
I've created a Tkinter Quick Reference page that describes the Tkinter classes and methods that we will use, as well as various widget classes that we won't have time to cover. For more information, the site TkDocs has a Tkinter tutorial and also points to the Tkinter reference pages. (The book Modern Tkinter is inexpensive and is also helpful, though it seems to contain just the same text as the Tkinter tutorial in PDF format.)
I've also created a quick reference page for Pygame, but in our lectures we won't have time to discuss how to use this library. If you choose Pygame for a semester project, you can learn more from many tutorials that are available online.
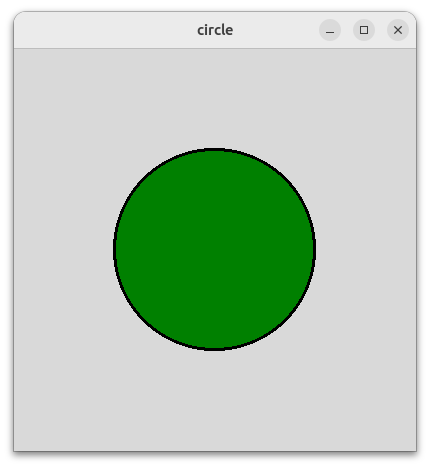
A canvas is a widget where a program may draw graphical shapes such as lines, circles and rectangles. Let's write a Tkinter program that creates a canvas and draws a green circle on it:
Here is the program:
import tkinter as tk

root = tk.Tk()         # create a top-level window for the application
root.title('circle')

canvas = tk.Canvas(root, width = 400, height = 400)
canvas.grid()

canvas.create_oval(100, 100, 300, 300, fill = 'green', width = 3)

root.mainloop()     # run the main loop
Let's look at the program line by line. We first import the tkinter library using the convenient abbreviation "tk".
The Tk() constructor creates a top-level window for your application. You can call the .title() method on this window to set its title.
We next create a canvas widget and specify values for two configuration options, namely 'width' and 'height' which determine the canvas's size. To make the canvas visible, we must call canvas.grid() to register it with the grid layout manager, which determines the positions and sizes of widgets in a window.
A canvas may contain various items such as lines, rectangles, or images. The call create_oval() creates an oval item, which is an ellipse (of which a circle is a special case). This program draws an oval whose bounding box is the square with (100, 100) at its upper-left corner, and (300, 300) at its lower-right corner. We specify two item configuration options, namely 'fill', the color with which to fill the oval, and 'width', the width of the outline in pixels.
Finally, we call the mainloop() method which tells Tkinter to run the main loop for our program. Typically any graphics library has such a main loop, which waits for events to occur and dispatches them to handler functions. In this first program we don't handle any events; we simply display graphics and wait for the user to close the window. Nevertheless we must still call mainloop().
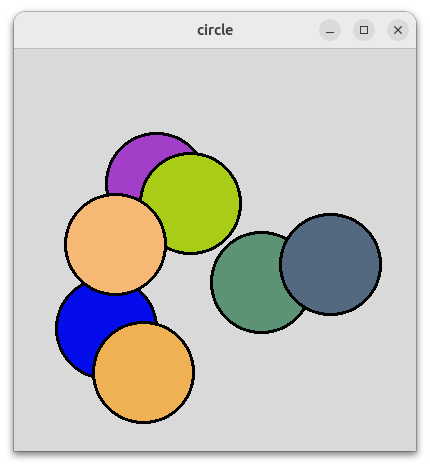
Let's modify our program so that it will create a new circle each time the user clicks the mouse. We'll give each new circle a random color. Here's the updated program:
from random import randrange
import tkinter as tk

root = tk.Tk()         # create a top-level window for the application
root.title('circle')

canvas = tk.Canvas(root, width = 400, height = 400)
canvas.grid()

def on_click(event):
    # choose a random color
    red, green, blue = randrange(256), randrange(256), randrange(256)
    color = f'#{red:02x}{green:02x}{blue:02x}'

    canvas.create_oval(event.x - 50, event.y - 50, event.x + 50, event.y + 50,
                       fill = color, width = 3)

canvas.bind('<Button>', on_click)

root.mainloop()     # run the main loop
In this program, on_click() is an event handler function that we want to run whenever the user clicks the mouse. We call the .bind() method to register this event handler to run in response to the '<Button>' event. (You can read about other event types in our quick reference guide.)
Every event handler function receives an argument 'event' holding an Event object with information about the event, such as the x/y coordinates of the position where the user clicked the mouse. In our event handler, we first generate a random color and encode its red/green/blue components as 2-digit hex numbers in a color string. We then create a circle with radius 50, centered at the position where the user clicked. Here's an image of the running program after I've clicked to create a few circles:
In many programs it's helpful to separate the code into a model and a view. The model is a class (or set of classes) that represent the state of the world and the rules for updating state. For example, if we are writing a chess game, there could be a model class Game that represents the game in progress. It might have a constructor Game() that constructs a new game. It could also have methods such as
player() - return the number (1 or 2) of the player whose turn it is to move
at(pos) – return the piece that is currently at position pos
move(from, to) – make a move from square from to square to
In a strict model-view architecture, model classes know nothing about the user interface. If we want to write several different user interfaces, we should be able to reuse the same model class(es) for each of them.
The view is a class (or set of classes) that is responsible for rendering the model, i.e. drawing the state of the world. Typically the view holds a pointer to the model.
In this form of architecture, there is sometimes an additional component called a controller that is responsible for processing input. When input arrives, the controller receives it and calls model methods to update the state of the world. Then someone (either the controller or the model, depending on the program) notifies the view that the state has changed and it's time to redraw it.
In my experience, a model-view architecture often leads to cleaner code than in programs where the model and view code are tangled together. I'd encourage you to use it when writing many graphical programs (or even when writing some programs with a textual user interface).
As an example of model-view architecture, let's write a program that lets two players play Tic-Tac-Toe.
First let's consider the model. We will have a single model class Game that represents a game in progress. In our program we will have only a single instance of Game. (If we wrote an AI player for the game, it might create additional Game objects representing hypothetical game states that it explores. We will see how to do this in Programming 2 next semester.)
What methods should our Game class have? We need an initializer to create a new Game. We should also have a method move(x, y) that makes a new move at a given position.
We will also need to have methods or attributes that the view can use to learn about the current game state. We can have a two-dimensional array 'at' that holds the contents of the board. Each element at[x][y] will be an integer: 0 means the square is empty, or a 1 or 2 mean that player 1 or 2 has moved there. (In theory we could instead use strings such as ' ', 'X' and 'O'. However, strictly speaking even that would be putting some knowledge of the view into the model. The model is not supposed to know how the marks on the board will appear.)
Additionally, let's have a boolean attribute 'game_over' that becomes true when the game is done, and an integer attribute 'winner' that holds the player number who won, or 0 if the game was a draw. Finally, since the view will need to display the winning squares, let's have an attribute 'winning_squares' that holds a list of their coordinates.
Here is an implementation of the model:
# model

class Game:
    def __init__(self):
        self.at = [3 * [0] for _ in range(3)]   # 3 x 3 array: 0 = empty, 1 = X, 2 = O
        self.turn = 1    # whose turn it is to play
        self.moves = 0   # number of moves so far
        self.game_over = False
        self.winner = 0  # player who won, or 0 = draw
        self.winning_squares = []

    def check(self, x, y, dx, dy):
        at = self.at
        if at[x][y] > 0 and at[x][y] == at[x + dx][y + dy] == at[x + 2 * dx][y + 2 * dy]:
            self.game_over = True
            self.winner = at[x][y]
            self.winning_squares = [(x + i * dx, y + i * dy) for i in range(3)]

    def check_win(self):
        for i in range(3):
            self.check(0, i, 1, 0)  # check row
            self.check(i, 0, 0, 1)  # check column
        self.check(0, 0, 1, 1)      # check first diagonal
        self.check(2, 0, -1, 1)     # check second diagonal

    def move(self, x, y):
        if self.at[x][y] == 0:   # square is available
            self.moves += 1
            self.at[x][y] = self.turn   # place an X or O
            self.turn = 3 - self.turn  # switch players
            self.check_win()
            if self.moves == 9:
self.game_over = TrueNow let's design the view. The board consists of a 3 x 3 grid of squares. Let's make the squares 100 pixels wide and tall. Additionally, let's plan to have a 50-pixel margin around the board. We could embed the constants 100 and 50 in various places throughout our code, but it's better to give names to them:
MARGIN = 50     # margin size in pixels
SQUARE = 100    # square size in pixels
In this and many other graphical programs, it is convenient to invent a custom coordinate system in which we can do our drawing. Let's use a coordinate system in which the square are only 1 unit high and 1 unit wide, and there is no margin. In this coordinate system the upper-left corner of the board will be at position (0, 0), and the lower-right will be at (3,0). Then, for example, the two vertical lines that form part of the board will extend from (1, 0) to (1, 3) and from (2, 0) to (2, 3).
In some graphics toolkits you can specify a custom coordinate system such as this one, and then all drawing commands will work with those coordinates. Tkinter does not have this feature (and neither does Pygame), however we can simulate it easily. Let's write a function that maps an x- or y-coordinate in our coordinate system (which we will call user coordinates) into pixel coordinates:
def coord(x):
    return MARGIN + SQUARE * x
And now to draw at (x, y) in user coordinates, we need only draw at (coord(x), coord(y)) in pixel coordinates.
Our view class will be a subclass of the Tkinter Canvas class. The built-in canvas methods that create lines, rectangles and ovals work in pixel coordinates. Let's make convenience methods that will do the same in user coordinates:
class View(Canvas):
    ...

    def line(self, x1, y1, x2, y2, **args):
        self.create_line(coord(x1), coord(y1), coord(x2), coord(y2), **args)

    def rectangle(self, x1, y1, x2, y2, **args):
        self.create_rectangle(coord(x1), coord(y1), coord(x2), coord(y2), **args)

    def oval(self, x1, y1, x2, y2, **args):
        self.create_oval(coord(x1), coord(y1), coord(x2), coord(y2), **args)
In these methods, the notation **args in each argument list causes Python to gather all keyword arguments (such as width = 3, color = 'black') into a dictionary. Then, in each method call the notation **args causes Python to explode the args dictionary into separate keyword arguments. And so the caller may pass any keyword arguments they like to our helper methods, which will pass them on to the underlying Tkinter Canvas methods.
Out View class will have an attribute 'game' that points to the model. When the user clicks the mouse, we'll call self.game.move() to make a move. We will then want to update the view. As one possibility, we could just draw what has changed, i.e. an X or an O for the move that was just made. However, if the move won the game, then we would also need to redraw all the winning squares to highlight them in some way.
Instead, we will use a different approach: when anything changes, we will redraw everything. I recommend this approach in many graphical programs: it will usually lead to the simplest code. On a Tkinter canvas, we can call delete('all') to delete all canvas items before redrawing.
Here is an implementation of the view:
import tkinter as tk

# view

MARGIN = 50     # margin size in pixels
SQUARE = 100    # square size in pixels
BOARD_SIZE = 3 * SQUARE + 2 * MARGIN

def coord(x):
    return MARGIN + SQUARE * x

class View(tk.Canvas):
    def __init__(self, parent):
        self.game = Game()
        super().__init__(parent, width = BOARD_SIZE, height = BOARD_SIZE)
        self.grid()
        self.bind('<Button>', self.on_click)
        self.draw()

    def line(self, x1, y1, x2, y2, **args):
        self.create_line(coord(x1), coord(y1), coord(x2), coord(y2), **args)

    def rectangle(self, x1, y1, x2, y2, **args):
        self.create_rectangle(coord(x1), coord(y1), coord(x2), coord(y2), **args)

    def oval(self, x1, y1, x2, y2, **args):
        self.create_oval(coord(x1), coord(y1), coord(x2), coord(y2), **args)

    def draw(self):
        self.delete('all')

        for i in range(1, 3):   # 1 .. 2
            self.line(i, 0, i, 3)  # vertical line
            self.line(0, i, 3, i)  # horizontal line

        for x, y in self.game.winning_squares:
            self.rectangle(x + 0.05, y + 0.05, x + 0.95, y + 0.95,
                           fill = 'green', width = 0)

        for x in range(0, 3):
            for y in range(0, 3):
                if self.game.at[x][y] == 1:    # draw an X
                    self.line(x + 0.1, y + 0.1, x + 0.9, y + 0.9, width = 3)
                    self.line(x + 0.9, y + 0.1, x + 0.1, y + 0.9, width = 3)
                elif self.game.at[x][y] == 2:   # draw an O
                    self.oval(x + 0.1, y + 0.1, x + 0.9, y + 0.9, width = 2)

    def on_click(self, event):
        if self.game.game_over:
            self.game = Game()       # start a new game
        else:
            play_x, play_y = int((event.x - MARGIN) / SQUARE), int((event.y - MARGIN) / SQUARE)
            if 0 <= play_x < 3 and 0 <= play_y < 3:     # valid square
                self.game.move(play_x, play_y)
        self.draw()

root = tk.Tk()
root.title('tic tac toe')
View(root)
root.mainloop()
The complete implementation (model plus view) is about 95 lines of Python code. Here is the program in action, where player X has just won the game:
