We may wish to display graphics in many programs. A typical notebook or monitor has a graphical display with a resolution of 1920 x 1080 pixels. Typically each pixel's color is a combination of red, green, and blue components, each of which is an 8-bit value.
Generally we will use a graphics library (also called a toolkit) to perform graphical output. Such libraries will allow us to draw low-level shapes such as lines, rectangles, and circles, and will usually provide higher-level widgets such as menus, buttons, toolbars that we can use to build more complex graphical interfaces. The term GUI (= graphical user interface) generally refers to a user interface of this sort.
Some popular cross-platform graphics toolkits include GTK and Qt. These are large and complex, and are accessible from many languages including Python. Most desktop applications that come with Ubuntu and other Linux distributions use either GTK or Qt.
Additionally, there exist various Python-specific libraries including Tkinter and Pygame. In this class we will study Tkinter. It is part of the standard library in every Python installation, and is arguably the standard graphical user interface library for Python.
Tkinter is a large library, and we will only study a small part of it in this course. I've created a Tkinter Quick Reference page that describes the Tkinter classes and methods that we will use.
For more information, the site TkDocs has a Tkinter tutorial and points to the Tkinter reference pages. (The book Modern Tkinter is inexpensive and is also helpful, though it seems to contain just the same text as the Tkinter tutorial in PDF format.)
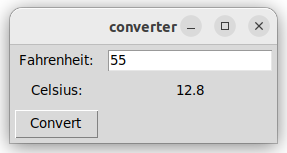
As a first example, let's look at a Tkinter program that can convert Fahrenheit temperatures into Celsius. When it runs, it will look like this:
Here is the code:
from tkinter import *
from tkinter import ttk
from tkinter import messagebox

root = Tk()
root.title('converter')

fahrenheit = StringVar()
celsius = StringVar()

def convert():
    try:
        f = float(fahrenheit.get())
    except ValueError:
        messagebox.showerror(message = 'Invalid input')
        fahrenheit.set('')
        return
    c = 5 / 9 * (f - 32)
    celsius.set(f'{c:.1f}')

ttk.Label(root, text = 'Fahrenheit:').grid(row = 0, column = 0)
ttk.Entry(root, textvariable = fahrenheit).grid(row = 0, column = 1)
ttk.Label(root, text = 'Celsius:').grid(row = 1, column = 0)
ttk.Label(root, textvariable = celsius).grid(row = 1, column = 1)
ttk.Button(root, text = 'Convert', command = convert).grid(row = 2, column = 0)

for w in root.winfo_children():
    w.grid_configure(padx = 5, pady = 5)

root.mainloop()
Let's study this program line by line. The program begins with two lines that you should include at the top of every Tkinter program:
from tkinter import *
from tkinter import ttk
"ttk" stands for "themed toolkit". The ttk submodule appeared around 2007, and contains newer and nicer-looking versions of various widgets (e.g. Button, Entry, Label). In general I recommend that you use the ttk versions of these widgets, as I have done in the code above.
The program also imports the messagebox module, which will allow us to display a message box later on:
from tkinter import messagebox
After that, the program creates the program's main window and gives it a title:
root = Tk()
root.title('converter')
The Tk class represents the main window (also called the 'root window') of a program. Traditionally we store the main window in a variable named 'root', though of course you can use any name you like.
Next, the program creates two control variables named 'fahrenheit' and 'celsius':
fahrenheit = StringVar()
celsius = StringVar()
As we will see shortly, you can associate a control variable with a Tkinter widget, which will display the variable's value. If it's a widget where the user can enter data, then you can call the control variable's get() method to find out the data has entered. Also, you can call the set() method to give a new value to the control variable, and the widget will automatically update.
Let's skip the convert() function for now. The next part of the program constructs various widgets and adds them to the main window:
ttk.Label(root, text = 'Fahrenheit:').grid(row = 0, column = 0)
ttk.Entry(root, textvariable = fahrenheit).grid(row = 0, column = 1)
ttk.Label(root, text = 'Celsius:').grid(row = 1, column = 0)
ttk.Label(root, textvariable = celsius).grid(row = 1, column = 1)
ttk.Button(root, text = 'Convert', command = convert).grid(row = 2, column = 0)
Each widget has various configuration options that affect its appearance. When you call a constructor to create a widget, you can specify options using keyword arguments.
A Label widget displays a piece of text:
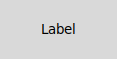
The text may either be static (specified via the 'text' parameter) or dynamic, in which case its value is in a control variable (specified by the 'textvariable' parameter).
An Entry widget displays a text box where the user can enter data:
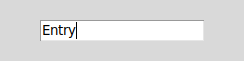
It uses a control variable (specified by the 'textvariable' parameter) that holds the text in the box.
A Button widget is a pushbutton:
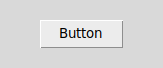
It runs a handler function (specified by the 'command' parameter) when the user presses the button.
We place all of these widgets in the window by calling the .grid() method. This adds them to the grid() geometry manager, which is reponsible for determining the exact placement of the widgets. (Other geometry managers exist in Tkinter, but we will not discuss them here.) In this geometry manager, widgets are arranged in a two-dimensional grid with row and column numbers indexed from zero.
Please note that you must call .grid() for every widget you create, otherwise it will not appear in the user interface.
Next, we have this loop:
for w in root.winfo_children():
    w.grid_configure(padx = 5, pady = 5)
The purpose of this code is to add padding (extra blank pixels) around the edges of the widgets so they will be spaced out nicely in the window.
The winfo_children() method returns all of a widget's children. When we invoke it on the root window, we get an enumeration of all the widgets that we just created. The grid_configure() method modifies a widget's grid options. We could have included 'padx = 5, pady = 5' inside all the calls to grid() above, but it's easier to specify it for all widgets at once as we have done here. 'padx' specifies a number of blank pixels to display to a widget's left and right; 'pady' specifies the number of blank pixels above and below.
At the end of the program we call the mainloop() method, which tells Tkinter to run the main loop for our program. Typically any graphics library has such a main loop, which waits for events to occur and dispatches them to event handler functions.
Finally, let's look at the convert() function:
def convert():
    try:
        f = float(fahrenheit.get())
    except ValueError:
        messagebox.showerror(message = 'Invalid input')
        fahrenheit.set('')
        return
    c = 5 / 9 * (f - 32)
    celsius.set(f'{c:.1f}')
The function calls .get() to retrieve the string that the user has typed in the text box, indicating a temperature in Fahrenheit. It calls float() to convert it to a float, then converts it to a Celsius temperature, which it places in the control variable 'celsius'. That will update the Label that displays this variable's value.
If the user has not entered a valid floating-point number, the function calls messagebox.showerror() to display an error dialog, then clears the text box and exits.
We now understand how to write a simple Tkinter program that arranges widgets in a grid, reacts to button presses and uses control variables to display and receive data. Let's now look at some other types of widgets in Tkinter.
A Checkbutton is a button that can be toggled on and off:

Here is a simple password generator program that uses a checkbutton to find out whether the user wants an uppercase password. It looks like this:

Here is the code:
from random import randrange
from tkinter import *
from tkinter import ttk

root = Tk()
root.title('password generator')

pw = StringVar()
upper = BooleanVar()

def generate():
    p = ''.join([chr(ord('a') + randrange(26)) for _ in range(10)])
    print(upper.get())
    if upper.get():
        p = p.upper()
    pw.set(p)

pas = ttk.Label(root, text = 'Password:').grid(row = 0, column = 0)
ttk.Entry(root, textvariable = pw).grid(row = 0, column = 1)

ttk.Button(root, text = 'Generate', command = generate).grid(row = 1, column = 0)
ttk.Checkbutton(root, text = 'Uppercase', variable = upper).grid(row = 1, column = 1)

for w in root.winfo_children():
    w.grid_configure(padx = 5, pady = 5)

root.mainloop()
Notice that the Checkbutton uses a control variable of type BooleanVar, which will be True if the button is checked.
A group of Radiobutton widgets allows the user to select one of several choices.

Here's a program that lets the user select a color using a group of radiobuttons. It looks like this:

Here's the code:
from tkinter import *
from tkinter import ttk
from tkinter import messagebox

root = Tk()
root.title('color selector')

colors = ['Red', 'Yellow', 'Blue', 'Purple']

color = StringVar()

ttk.Label(root, text = 'Select a color:').grid(row = 0, column = 0)

for i, c in enumerate(colors):
    b = ttk.Radiobutton(root, text = c, variable = color, value = c.lower())
    b.grid(row = 1 + i % 2, column = i // 2, sticky = W)

def ok():
    messagebox.showinfo(message = 'selected color = ' + color.get())
    root.destroy()

ttk.Button(root, text = 'OK', command = ok).grid(row = 3, column = 0)

for w in root.winfo_children():
    w.grid_configure(padx = 5, pady = 5)

color.set('red')
root.mainloop()
Note that each radio button has an option 'value' that is a string associated with the button. All the radio buttons share a single control variable 'color' that holds the value of the currently selected button. When the user presses OK, the program displays a message box with the selected color. Then it destroys the root window, which causes the program to exit.
Also notice that when we place each radiobutton in the grid, we specify the option 'sticky = W'. Here, W means west, i.e. to the left. This option causes all radiobuttons to stick to the left edge of their grid cells, which makes them line up nicely. If we didn't specify this option, the radiobuttons would be centered in their cells, which wouldn't look as nice.
A Listbox is a list of text items that lets the user select one or more items:
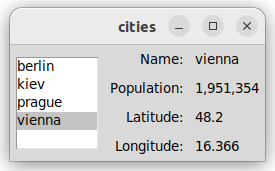
Here's a program that displays a list of city names in a listbox. When the user selects a city, the program displays some information about it. It looks like this:
Here is the code:
from tkinter import *
from tkinter import ttk

class City:
    def __init__(self, name, pop, lat, long):
        self.name = name
        self.pop = pop
        self.lat = lat
        self.long = long

cities = [
    City('berlin', 3677472, 52.52, 13.405),
    City('kiev', 2962180, 50.45, 30.523),
    City('prague', 1275406, 50.087, 14.421),
    City('vienna', 1951354, 48.2, 16.366)]

root = Tk()
root.title('cities')

city_names = [city.name for city in cities]
choices = StringVar(value = city_names)
listbox = Listbox(root, listvariable = choices, height = 5, width = 10)
listbox.grid(rowspan = 4)
for i, t in enumerate(['Name', 'Population', 'Latitude', 'Longitude']):
    ttk.Label(text = t + ':').grid(row = i, column = 1, sticky = E)

name, pop, lat, long = StringVar(), StringVar(), StringVar(), StringVar()

for i, v in enumerate([name, pop, lat, long]):
    ttk.Label(textvariable = v).grid(row = i, column = 2, sticky = W)

def on_select(ev):
    [n] = listbox.curselection()
    city = cities[n]
    name.set(city.name)
    pop.set(f'{city.pop:,d}')
    lat.set(city.lat)
    long.set(city.long)

listbox.selection_set(0)
on_select(None)
listbox.bind('<<ListboxSelect>>', on_select)

for w in root.winfo_children():
    w.grid_configure(padx = 5, pady = 5)
root.mainloop()
Notice that the Listbox uses a control variable 'choices' of type StringVar. This control variable holds a list of strings to display in the Listbox. (It is a bit odd that a StringVar holds a list of strings; this is arguably an inconsistency in the Tkinter API.)
The code calls the .bind() method to specify an event handler function on_select() that will run when the user selects an item in the list box. We saw above that the Button widget has an option 'command' that holds a function to run when the button is clicked, but there is no analogous option for listboxes; we must bind the event by name. The <<ListboxSelect>> event type is specific to listboxes. (When we study the canvas widget below, we will see other event types that will work with any widget.)
The on_select() function receives an Event object with information about the event that occurred, though we ignore that object in this program. The function retrieves the index of the currently selected item like this:
[n] = listbox.curselection()
curselection() returns a list, because listboxes have a mode (which we're not using in this program) in which multiple items can be selected at once. In this program the list is guaranteed to contain only a single value, so we can use the list assignment above to place that value in 'n'.
A Canvas widget is a rectangular area where you can draw any graphics that you like:
The canvas widget is flexible and powerful. In fact, some Tkinter programs (e.g. video games) might use only a single canvas widget inside a top-level window.
You may place canvas items on a canvas. Each canvas item represents a shape or image, and has an integer ID. Each canvas item has various configuration options which you can set when you create an item, and which you can modify later using the itemconfigure() method of the Canvas class.
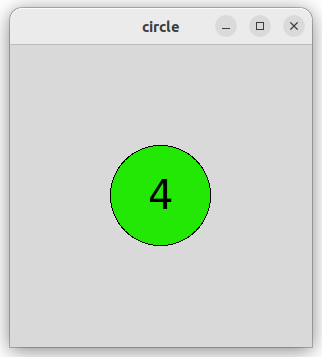
Let's look at a simple program that uses a canvas. It displays a colored circle with a number inside it. Each time the user clicks the canvas, the circle changes to a new random color, and the number increases by 1. It looks like this:
Here is the code:
import random
from tkinter import *
from tkinter import font

count = 0

root = Tk()
root.title('circle')

font = font.nametofont('TkDefaultFont')
font.configure(size = 30)

canvas = Canvas(root, width = 300, height = 300)
canvas.grid()

circle_id = canvas.create_oval(100, 100, 200, 200, fill = 'red')
text_id = canvas.create_text(150, 150, text = '0')

def rcolor():
    return f'{random.randrange(256):02x}'

def update(event):
    global count

    color = '#' + rcolor() + rcolor() + rcolor()
    canvas.itemconfigure(circle_id, fill = color)
    count += 1
    canvas.itemconfigure(text_id, text = f'{count}')

canvas.bind('<Button>', update)

root.mainloop()
The program calls the create_oval() and create_text() methods to create two canvas items. The call to create_oval() specifes the upper-left corner (100, 100) and lower-right corner (200, 200) of a rectangle that encloses the oval; this is called the oval's bounding box. Note that in Tkinter (as is usual in computer graphics) the upper-left corner of the canvas has coordinates (0, 0), and y increases in a downward direction. The call to create_text() specifies the center of the text.
The program calls the .bind() method to specify an event handler function update() that will run when the <Button> event occurs, i.e. when the user clicks the mouse. <Button> is one of a number of events that will work with any widget. update() generates a random color of the form #RRGGBB, where RR, GG and BB are two-digit hexadecimal numbers. It then calls itemconfigure() to update the 'fill' and 'text' options of the two canvas items. Note that the calls to create_oval() and create_text() returned integer ids for these canvas items, which we can pass to itemconfigure().